Presets
Presets provide pre-configured templates for both blocks and sections, allowing merchants to quickly add common variations without manual configuration. Think of them as "starter templates" or "quick-start options" that appear in the theme editor.
You can define presets in two ways:
- Inline: Using the
presets()method directly in your block/section class - Standalone: Creating dedicated preset classes that extend
Preset
What Are Presets?
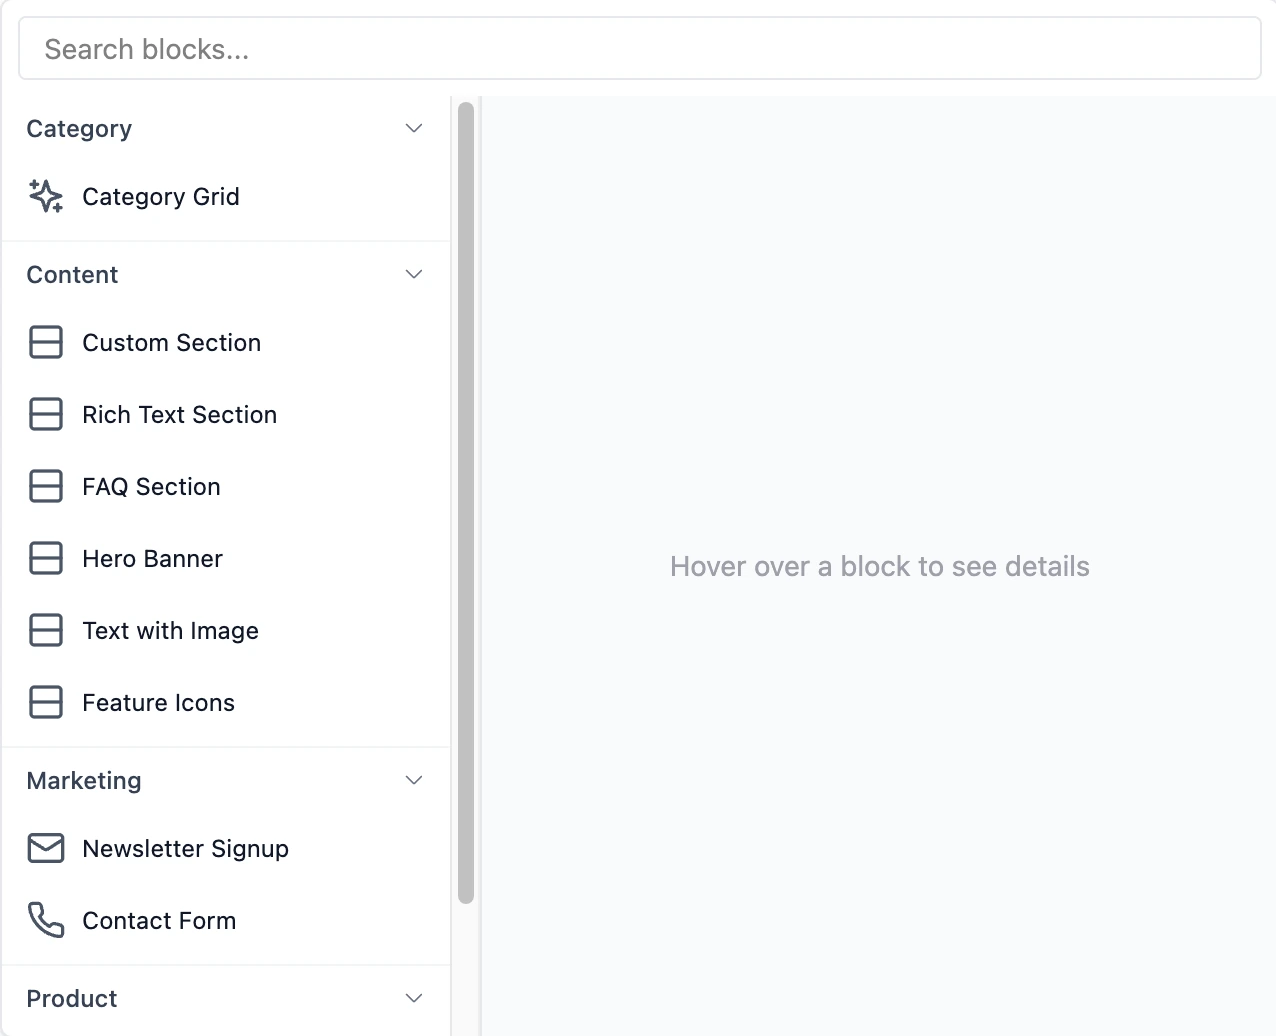
When merchants add a block or section in the Visual theme editor, they can choose from a list of presets - pre-configured variations with different settings, layouts, and child blocks already set up.
Why Use Presets?
✅ Faster setup - Merchants get started quickly with sensible defaults
✅ Better UX - Guide merchants toward common patterns
✅ Consistency - Ensure brand-aligned variations
✅ Discoverability - Show what's possible with your blocks/sections
Basic Presets
Define presets by overriding the presets() method:
<?php

namespace Themes\YourTheme\Blocks;

use BagistoPlus\Visual\Blocks\SimpleBlock;
use BagistoPlus\Visual\Settings\Text;
use BagistoPlus\Visual\Settings\Select;
use BagistoPlus\Visual\Support\Preset;

class Button extends SimpleBlock
{
    protected static string $view = 'shop::blocks.button';

    public static function settings(): array
    {
        // ...
    }

    public static function presets(): array
    {
        return [
            Preset::make('Primary CTA')
                ->settings([
                    'text' => 'Shop Now',
                    'style' => 'primary',
                    'size' => 'large',
                ]),
        ];
    }
}
Preset Structure
Each preset can have these properties:
| Property | Type | Description |
|---|---|---|
name | string | Required. Display name in theme editor |
description | string | Optional description shown to merchants |
icon | string | Icon identifier (e.g., heroicon-o-star) |
category | string | Group presets into categories |
previewImageUrl | string | URL to preview image |
settings | array | Default settings values (block settings) |
children | array | Default child blocks (for containers/sections) |
Example
use BagistoPlus\Visual\Support\Preset;

public static function presets(): array
{
    return [
        Preset::make('Success Alert')
            ->description('Green alert for success messages')
            ->icon('heroicon-o-check-circle')
            ->category('Alerts')
            ->previewImageUrl('/images/presets/success-alert.png')
            ->settings([
                'message' => 'Success! Your action was completed.',
                'type' => 'success',
                'dismissible' => true,
            ]),

        Preset::make('Error Alert')
            ->description('Red alert for error messages')
            ->icon('heroicon-o-x-circle')
            ->category('Alerts')
            ->settings([
                'message' => 'Error! Something went wrong.',
                'type' => 'error',
                'dismissible' => true,
            ]),
    ];
}
Presets with Child Blocks
Sections and container blocks can include pre-configured child blocks in their presets:
Section Preset with Child Blocks
use BagistoPlus\Visual\Support\Preset;
use BagistoPlus\Visual\Support\PresetBlock;

public static function presets(): array
{
    return [
        Preset::make('Hero with CTA')
            ->description('Full-width hero with heading and call-to-action button')
            ->icon('heroicon-o-photograph')
            ->category('Banners')
            ->settings([
                'layout' => 'centered',
                'background_color' => '#4f46e5',
            ])
            ->blocks([
                PresetBlock::make('heading')
                    ->id('hero-title')
                    ->settings([
                        'text' => 'Welcome to Our Store',
                        'level' => 1,
                    ]),

                PresetBlock::make('paragraph')
                    ->id('hero-subtitle')
                    ->settings([
                        'text' => 'Discover amazing products at great prices',
                    ]),

                PresetBlock::make('button')
                    ->id('hero-cta')
                    ->settings([
                        'text' => 'Shop Now',
                        'style' => 'primary',
                    ]),
            ]),

        Preset::make('Hero with Email Signup')
            ->description('Hero section with email capture form')
            ->icon('heroicon-o-mail')
            ->category('Banners')
            ->settings([
                'layout' => 'centered',
            ])
            ->blocks([
                PresetBlock::make('heading')
                    ->settings(['text' => 'Join Our Newsletter']),

                PresetBlock::make('paragraph')
                    ->settings(['text' => 'Get exclusive deals and updates']),

                PresetBlock::make('email-input'),
                PresetBlock::make('button')
                    ->settings(['text' => 'Subscribe']),
            ]),
    ];
}
PresetBlock API
When defining child blocks in presets, use PresetBlock::make():
PresetBlock::make('button')
    ->id('unique-id')                    // Semantic ID
    ->name('Custom Name')                 // Display name in editor
    ->settings([...])                     // Block settings values
    ->static()                            // Lock from editing
    ->children([...])                     // Nested child blocks
    ->order(['id1', 'id2'])              // Rendering order
Dynamic Sources in Presets
Settings values in presets can use dynamic sources to resolve from runtime context:
PresetBlock::make('@awesome-theme/product-card')
    ->id('grid-card')
    ->static()
    ->settings([
        'productName' => '@product.name',        // Resolves from context
        'price' => '@product.price',
        'image' => '@product.base_image.url',
    ])
    ->children([
        PresetBlock::make('@awesome-theme/product-image')
            ->settings([
                'src' => '@product.base_image.url',
                'alt' => '@product.name',
            ]),
        PresetBlock::make('@awesome-theme/product-title')
            ->settings([
                'text' => '@product.name',
                'url' => '@product.url',
            ]),
    ])
The @ prefix enables blocks to access:
- Page context (variables passed from controllers)
- Parent-shared data (via
share()method) - Model properties using dot notation
This is especially useful for static blocks that need to display different data based on loop context.
Learn more: Dynamic Sources
PresetBlock Methods
| Method | Description |
|---|---|
type(string) | Block type (e.g., 'button', 'heading') |
id(string) | Unique semantic ID for the block |
name(string) | Custom display name in editor |
settings(array) | Block settings values |
static(bool) | Mark as static (non-editable by merchant) |
children(array) | Nested child blocks |
order(array) | Order of child block IDs |
Reusable Preset Classes
For reusable, shareable, or complex presets, you can define them as standalone classes instead of inline arrays. This approach is particularly useful for:
- Theme-wide presets shared across multiple blocks/sections
- Complex configurations with deep nesting
- Reusable templates across different themes
- Version-controlled presets maintained separately
Creating a Standalone Preset Class
Standalone preset classes extend BagistoPlus\Visual\Support\Preset and implement two key methods:
<?php

namespace Themes\YourTheme\Presets;

use BagistoPlus\Visual\Support\Preset;
use BagistoPlus\Visual\Support\PresetBlock;

class HeroBanner extends Preset
{
    /**
     * Specify which block or section this preset is for
     */
    protected function getType(): string
    {
        return '@your-theme/hero-section';
    }

    /**
     * Configure the preset
     */
    protected function build(): void
    {
        $this
            ->name('Hero Banner')
            ->description('Full-width hero with heading, text, and CTA')
            ->icon('heroicon-o-photograph')
            ->category('Banners')
            ->settings([
                'layout' => 'centered',
                'background_color' => '#4f46e5',
                'padding' => 'large',
            ])
            ->blocks([
                PresetBlock::make('@your-theme/heading')
                    ->id('hero-title')
                    ->settings([
                        'text' => 'Welcome to Our Store',
                        'level' => 1,
                        'color' => 'white',
                    ]),

                PresetBlock::make('@your-theme/paragraph')
                    ->id('hero-subtitle')
                    ->settings([
                        'text' => 'Discover amazing products at great prices',
                        'color' => 'white',
                    ]),

                PresetBlock::make('@your-theme/button')
                    ->id('hero-cta')
                    ->settings([
                        'text' => 'Shop Now',
                        'style' => 'primary',
                        'size' => 'large',
                    ]),
            ]);
    }
}
Using PresetBlock
Always use PresetBlock from the Visual package when defining child blocks in presets:
use BagistoPlus\Visual\Support\Preset;
use BagistoPlus\Visual\Support\PresetBlock;

public static function presets(): array
{
    return [
        Preset::make('Hero Banner')
            ->blocks([
                PresetBlock::make('heading')
                    ->settings(['text' => 'Welcome']),

                PresetBlock::make('button')
                    ->settings(['text' => 'Shop Now']),
            ]),
    ];
}
The block type identifier can be:
- Simple name:
'button','heading'(for built-in or theme blocks) - Namespaced:
'@your-theme/button','@visual-debut/heading'(explicit namespace)
Example: Complex Nested Preset
<?php

namespace Themes\YourTheme\Presets;

use BagistoPlus\Visual\Support\Preset;
use BagistoPlus\Visual\Support\PresetBlock;

class FeatureGrid extends Preset
{
    protected function getType(): string
    {
        return '@your-theme/flex-section';
    }

    protected function build(): void
    {
        $this
            ->name('Feature Grid')
            ->description('Three-column feature grid with icons')
            ->category('Content')
            ->settings([
                'layout' => 'grid',
                'columns' => 3,
            ])
            ->blocks([
                // First feature
                PresetBlock::make('@your-theme/container')
                    ->id('feature-1')
                    ->settings(['alignment' => 'center'])
                    ->children([
                        PresetBlock::make('@your-theme/icon')
                            ->settings([
                                'icon' => 'heroicon-o-lightning-bolt',
                                'size' => 'large',
                            ]),
                        PresetBlock::make('@your-theme/heading')
                            ->settings([
                                'text' => 'Fast Shipping',
                                'level' => 3,
                            ]),
                        PresetBlock::make('@your-theme/paragraph')
                            ->settings([
                                'text' => 'Get your order in 2-3 business days',
                            ]),
                    ]),

                // Second feature
                PresetBlock::make('@your-theme/container')
                    ->id('feature-2')
                    ->settings(['alignment' => 'center'])
                    ->children([
                        PresetBlock::make('@your-theme/icon')
                            ->settings([
                                'icon' => 'heroicon-o-shield-check',
                                'size' => 'large',
                            ]),
                        PresetBlock::make('@your-theme/heading')
                            ->settings([
                                'text' => 'Secure Checkout',
                                'level' => 3,
                            ]),
                        PresetBlock::make('@your-theme/paragraph')
                            ->settings([
                                'text' => 'Your payment information is safe',
                            ]),
                    ]),

                // Third feature
                PresetBlock::make('@your-theme/container')
                    ->id('feature-3')
                    ->settings(['alignment' => 'center'])
                    ->children([
                        PresetBlock::make('@your-theme/icon')
                            ->settings([
                                'icon' => 'heroicon-o-heart',
                                'size' => 'large',
                            ]),
                        PresetBlock::make('@your-theme/heading')
                            ->settings([
                                'text' => '100% Satisfaction',
                                'level' => 3,
                            ]),
                        PresetBlock::make('@your-theme/paragraph')
                            ->settings([
                                'text' => 'Love it or return it within 30 days',
                            ]),
                    ]),
            ]);
    }
}
Organizing Preset Classes
Store standalone preset classes in a dedicated directory:
your-theme/
└── src/
    └── Presets/
        ├── HeroBanner.php
        ├── FeatureGrid.php
        ├── TestimonialCarousel.php
        └── ClassicFooter.php
Registering Standalone Presets
Bagisto Visual automatically discovers standalone preset classes from:
app/Visual/Presetspackages/<Vendor>/<Theme>/src/Presets
For other locations, you can manually register presets in a service provider:
Discover a directory
Use discoverPresetsIn() to auto-discover all preset classes in a directory. The method requires two parameters:
- The directory path containing your preset classes
- The base namespace for those presets (defaults to
'App\\Presets')
Visual::discoverPresetsIn(
    base_path('modules/Shared/Presets'),
    'Modules\\Shared\\Presets'
);
This will automatically discover and register all preset classes in the specified directory, matching the namespace structure to the folder structure.
When to Use Standalone Preset Classes
| Use Standalone Classes When | Use Inline presets() Method When |
|---|---|
| Preset is complex with deep nesting | Preset is simple (2-3 properties) |
| Preset is reused across themes | Preset is specific to one block |
Preset needs to be reused in other presets (::asChild()) | Preset is only used inline |
| Preset requires translations | Preset uses static values |
| Preset is version-controlled separately | Preset is quick variations |
| Multiple presets share logic | Variations are straightforward |
Reusing Presets with ::asChild()
Standalone preset classes can be reused as child blocks within other presets using the ::asChild() method. This enables composition and eliminates duplication when the same preset configuration needs to appear in multiple places.
Basic Usage
<?php

namespace Themes\YourTheme\Presets;

use BagistoPlus\Visual\Support\Preset;
use BagistoPlus\Visual\Support\PresetBlock;

// Define a reusable preset
class ProductCard extends Preset
{
    protected function getType(): string
    {
        return '@your-theme/product-card';
    }

    protected function build(): void
    {
        $this
            ->name('Product Card with Overlay')
            ->category('Products')
            ->blocks([
                PresetBlock::make('@your-theme/product-image')
                    ->settings(['aspect_ratio' => 'square']),

                PresetBlock::make('@your-theme/product-title')
                    ->settings(['size' => 'large']),

                PresetBlock::make('@your-theme/product-price')
                    ->settings(['show_compare' => true]),
            ]);
    }
}

// Reuse it in another preset
class ProductGrid extends Preset
{
    protected function getType(): string
    {
        return '@your-theme/product-grid';
    }

    protected function build(): void
    {
        $this
            ->name('Featured Products Grid')
            ->settings(['columns' => 4])
            ->blocks([
                PresetBlock::make('@your-theme/heading')
                    ->settings(['text' => 'Featured Products']),

                // Reuse ProductCard preset as a child block
                ProductCard::asChild()
                    ->id('product-card')
                    ->static()
                    ->repeated(),
            ]);
    }
}
Real-World Examples
Example 1: Testimonials Section
use BagistoPlus\Visual\Support\Preset;
use BagistoPlus\Visual\Support\PresetBlock;

public static function presets(): array
{
    return [
        Preset::make('Three Testimonials')
            ->description('Grid of three customer testimonials')
            ->icon('heroicon-o-chat-bubble-left-right')
            ->category('Social Proof')
            ->settings([
                'heading' => 'What Our Customers Say',
                'layout' => 'grid',
            ])
            ->blocks([
                PresetBlock::make('testimonial')
                    ->settings([
                        'quote' => 'Amazing product! Highly recommend.',
                        'author' => 'John Doe',
                        'rating' => 5,
                    ]),

                PresetBlock::make('testimonial')
                    ->settings([
                        'quote' => 'Great quality and fast shipping.',
                        'author' => 'Jane Smith',
                        'rating' => 5,
                    ]),

                PresetBlock::make('testimonial')
                    ->settings([
                        'quote' => 'Excellent customer service!',
                        'author' => 'Bob Johnson',
                        'rating' => 5,
                    ]),
            ]),

        Preset::make('Carousel Testimonials')
            ->description('Scrolling carousel of testimonials')
            ->icon('heroicon-o-arrow-path')
            ->category('Social Proof')
            ->settings([
                'heading' => 'Customer Reviews',
                'layout' => 'carousel',
            ])
            ->blocks([
                PresetBlock::make('testimonial')->repeated(),
                PresetBlock::make('testimonial')->repeated(),
                PresetBlock::make('testimonial')->repeated(),
                PresetBlock::make('testimonial')->repeated(),
            ]),
    ];
}
Example 2: Gallery Section
use BagistoPlus\Visual\Support\Preset;
use BagistoPlus\Visual\Support\PresetBlock;

public static function presets(): array
{
    return [
        Preset::make('2 Column Grid')
            ->category('Galleries')
            ->settings(['columns' => 2])
            ->blocks([
                PresetBlock::make('image'),
                PresetBlock::make('image'),
                PresetBlock::make('image'),
                PresetBlock::make('image'),
            ]),

        Preset::make('3 Column Masonry')
            ->category('Galleries')
            ->settings(['columns' => 3, 'style' => 'masonry'])
            ->blocks([
                PresetBlock::make('image'),
                PresetBlock::make('image'),
                PresetBlock::make('image'),
                PresetBlock::make('image'),
                PresetBlock::make('image'),
                PresetBlock::make('image'),
            ]),

        Preset::make('Image Carousel')
            ->category('Galleries')
            ->settings(['style' => 'carousel', 'autoplay' => true])
            ->blocks([
                PresetBlock::make('image')->repeated(),
                PresetBlock::make('image')->repeated(),
                PresetBlock::make('image')->repeated(),
            ]),
    ];
}
Example 3: Call-to-Action Variations
use BagistoPlus\Visual\Support\Preset;
use BagistoPlus\Visual\Support\PresetBlock;

public static function presets(): array
{
    return [
        Preset::make('Simple CTA')
            ->category('CTAs')
            ->settings(['layout' => 'simple'])
            ->blocks([
                PresetBlock::make('heading')
                    ->settings(['text' => 'Ready to get started?'])
                    ->static(),

                PresetBlock::make('button')
                    ->settings(['text' => 'Get Started', 'style' => 'primary']),
            ]),

        Preset::make('Split CTA with Image')
            ->category('CTAs')
            ->settings(['layout' => 'split'])
            ->blocks([
                PresetBlock::make('image')
                    ->settings(['image' => '/default-cta.jpg'])
                    ->static(),

                PresetBlock::make('heading')
                    ->settings(['text' => 'Join thousands of happy customers']),

                PresetBlock::make('paragraph')
                    ->settings(['text' => 'Start your journey today']),

                PresetBlock::make('button')
                    ->settings(['text' => 'Sign Up Free']),
            ]),
    ];
}
Preview Images
Add visual previews to help merchants choose:
use BagistoPlus\Visual\Support\Preset;

Preset::make('Hero with Image Left')
    ->previewImageUrl('/images/presets/hero-image-left.png')
Tips for preview images:
- Use 16:9 aspect ratio (e.g., 800x450px)
- Show realistic content, not placeholders
- Keep file size under 100KB
- Use PNG or JPEG format
- Store in
public/images/presets/
Next Steps
- Block Schema - Complete guide to block settings and schema
- Container Blocks - Blocks that accept children
- Sections Overview - Building sections
- Settings Types - Available setting field types